


Welcome to our comprehensive guide on the Godot game engine! In this article, we will provide an introduction to Godot and walk you through 12 different sections, each containing two examples that will help you grasp the basics of this powerful game development tool. Along the way, we’ll also share links to the official Godot documentation and other resources, so you can continue learning and expanding your skillset.
Godot is a powerful, open-source game engine designed to create both 2D and 3D games. With its flexible node-based architecture and built-in scripting language, GDScript, Godot allows developers to create complex game logic and interactions with ease. If you’re new to game development or programming in general, you may find our previous tutorial on Python helpful as a foundation.
1. Downloading and Installing Godot
To get started with Godot, you will first need to download and install the engine. Visit the official Godot download page to download the latest stable version for your operating system (Windows, macOS, or Linux).
After downloading the file, follow the installation instructions for your specific operating system, as outlined in the official Godot documentation. Once the installation is complete, launch the Godot editor to begin creating your first project.
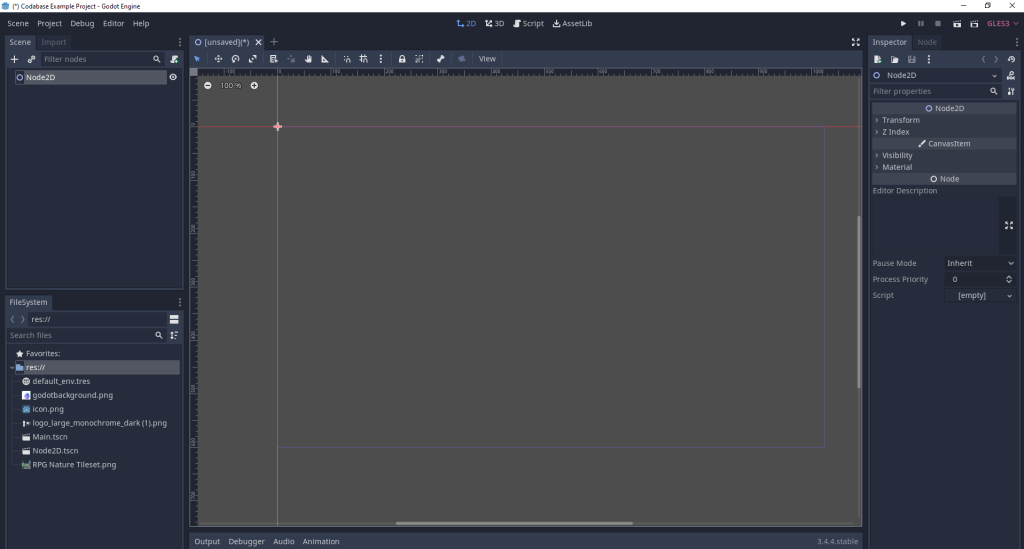
2. Creating a New Project
Upon launching the Godot editor, you will be greeted by the Project Manager. To create a new project, click on the “New Project” button and enter a project name and path. Next, choose either “OpenGL ES 3.0” or “OpenGL ES 2.0” as the renderer. For most projects, the default “OpenGL ES 3.0” renderer is recommended.
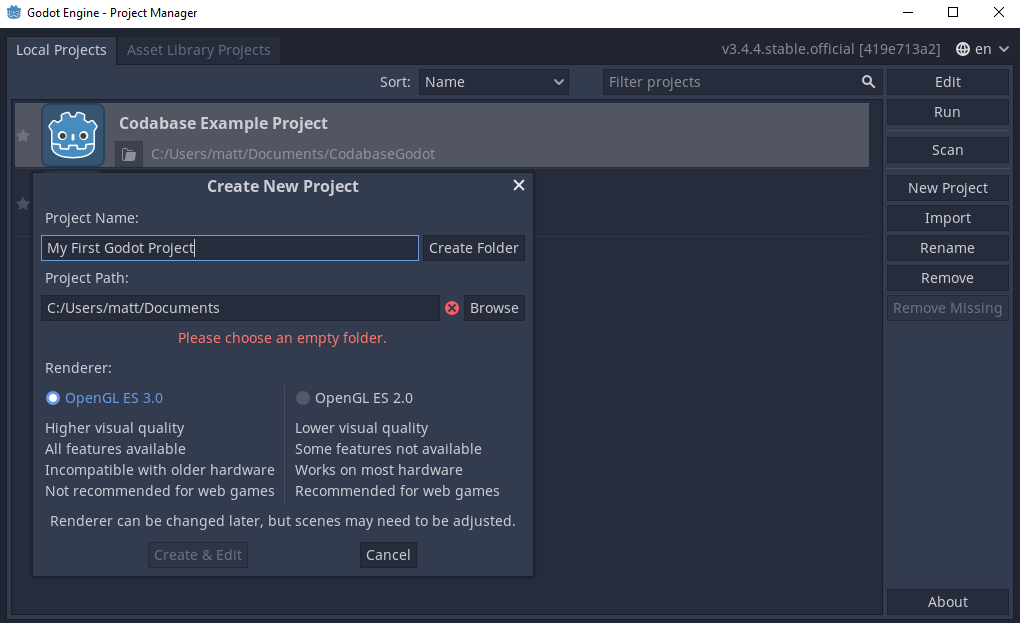
Example: Creating a new project
- Click "New Project"
- Enter project name: "MyFirstGodotGame"
- Choose a project path
- Select renderer: "OpenGL ES 3.0"
- Click "Create & Edit"
After clicking “Create & Edit,” Godot will open your new project in the editor, where you can begin building your game. For a more detailed explanation of the project creation process, refer to the official Godot documentation.
3. Understanding Nodes and Scenes
In Godot, everything is built using nodes. Nodes are the fundamental building blocks of your game and can represent objects, characters, lights, cameras, and more. Nodes can be arranged in a hierarchical structure, known as a “scene tree.”
A “scene” in Godot is a collection of nodes that work together to create a specific game element or functionality. Scenes can be saved, reused, and even inherited by other scenes. To create a new scene, click the “New Scene” button in the top-left corner of the editor.
Example: Creating a new scene
- Click "New Scene"
- Add a root node (e.g., Node2D, Spatial, or Control)
- Save the scene with a descriptive name (e.g., "Main.tscn")
For a deeper understanding of nodes and scenes, consult the official Godot documentation.
4. GDScript: Godot’s Scripting Language
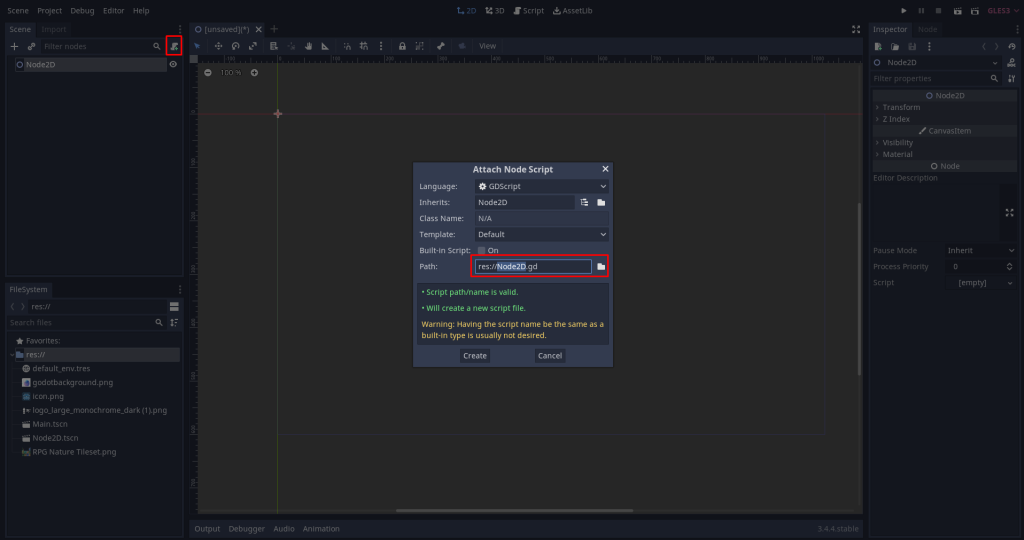
Godot uses its own scripting language called GDScript, which is similar to Python. GDScript allows you to define the logic and behavior of your game. To create a new script, right-click on a node in the scene tree and select “Add Script.” You can also create a script by selecting “File” > “New Script” from the main menu.
Example: Creating a new script
- Right-click on a node in the scene tree
- Select "Add Script"
- Choose a language (e.g., GDScript)
- Save the script with a descriptive name (e.g., "Player.gd")
For more information on GDScript, including syntax and best practices, refer to the official Godot documentation or check out our posts on GDScript & Functions.
5. Input Handling
Handling user input is an essential aspect of game development. Godot provides a built-in input system that allows you to easily process keyboard, mouse, and controller inputs. To define input actions, go to “Project” > “Project Settings” > “Input Map” and add your custom actions.
Example: Defining input actions
- Go to "Project" > "Project Settings" > "Input Map"
- Add a new action: "move_up"
- Assign a key to the action (e.g., "W" or "Up Arrow")
After defining your input actions, you can use them in your scripts. For example, you can use the Input.is_action_pressed() function to check if a specific action is being pressed.
Let’s try by example using KinematicBody2D
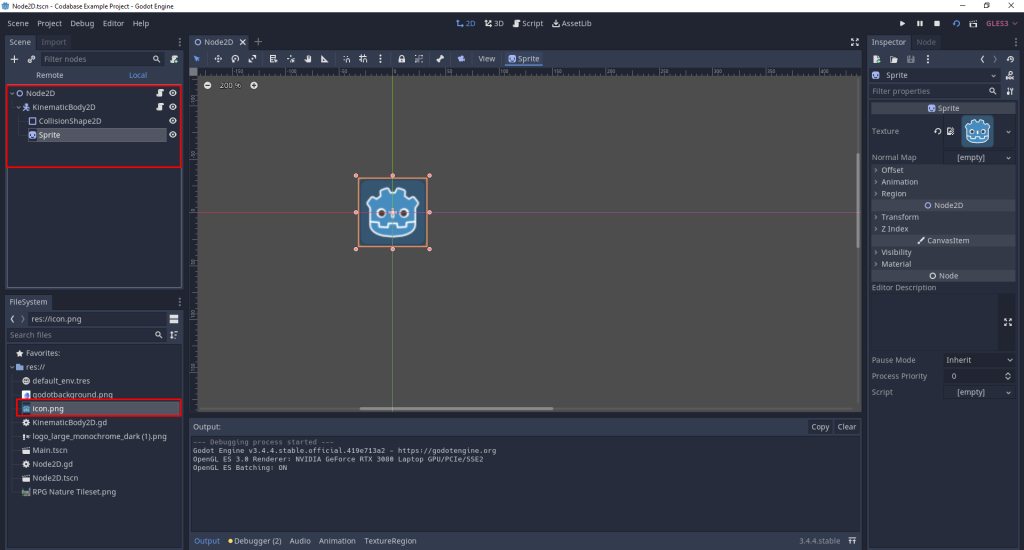
Now attach a script to the KinematicBody2D node. You may name it however you like, for this example we’ll use the default “KinematicBody2D.gd”. Please note that I’ve also added a Sprite underneath the KinematicBody2D node and dragged the icon.png default file that comes with Godot’s new project onto the Texture box in the inspector after selecting the Sprite node.
Place the following code inside:
extends KinematicBody2D

# Constants
const SPEED = 200

# Variables
var velocity = Vector2.ZERO

func _physics_process(delta):
    # Reset the velocity
    velocity = Vector2.ZERO

    # Get input
    var input_vector = Vector2(
        Input.get_action_strength("ui_right") - Input.get_action_strength("ui_left"),
        Input.get_action_strength("ui_down") - Input.get_action_strength("ui_up")
    )

    # Normalize the input vector to avoid diagonal movement being faster
    if input_vector.length() > 0:
        input_vector = input_vector.normalized()

    # Apply movement
    velocity = input_vector * SPEED
    move_and_slide(velocity)
Once the code above has been added to the KinematicBody2D script (attached to the KinematicBody2D node), then hit the Play Scene button, or press F6
![]()
6. Physics and Collisions
Godot provides built-in support for physics and collision detection. To create a physics object, you need to add a RigidBody2D (for 2D) or RigidBody (for 3D) node to your scene. Next, add a collision shape to your physics object by adding a CollisionShape2D (for 2D) or CollisionShape (for 3D) node as a child of the rigid body node.
Example: Creating a physics object
- Add a RigidBody2D node to the scene
- Add a CollisionShape2D node as a child of the RigidBody2D node
- Choose a shape for the CollisionShape2D (e.g., CircleShape2D)
For more information on physics and collisions in Godot, consult the official Godot documentation.
With the example above, I’ve added another KinematicBody2D Node for the “colliding object”. I also placed a CollisionShape2D node and drew a Rectangle Shape around this second object. Also, ensure you have added a CollisionShape2D to your initial object you had made:

Now when I run the scene, having just set up the CollisionShape2D objects, our moving object should be stopped by the new one:
7. Animations
Animations are an integral part of game development, and Godot makes it easy to create and manage them. To create an animation, you’ll need to add an AnimationPlayer node to your scene. This node allows you to create, edit, and control animations for any property of a node.
Example: Creating an animation
- Add an AnimationPlayer node to the scene
- Select the AnimationPlayer node
- Click "New" to create a new animation
- Enter an animation name (e.g., "Walk")
Once you’ve created an animation, you can use the animation editor to add keyframes for various properties. For more information on animations in Godot, refer to the official Godot documentation.
8. Audio
Godot provides an advanced audio system that allows you to play sounds and music in your game. To play audio, you need to add an AudioStreamPlayer2D (for 2D) or AudioStreamPlayer (for 3D) node to your scene. Then, load an audio file and assign it to the “Stream” property of the audio player.
Example: Playing audio
- Add an AudioStreamPlayer2D node to the scene
- Load an audio file (e.g., "Jump.wav")
- Assign the audio file to the "Stream" property of the AudioStreamPlayer2D node
- Call the "play()" function in a script to play the audio
For more information on audio in Godot, consult the official Godot documentation.
9. GUI and User Interface
Godot offers a powerful GUI system that allows you to create user interfaces for your game. To create a GUI, you’ll need to add a Control node to your scene. This node serves as the root node for all GUI elements. You can then add various child nodes, such as Button, Label, or ProgressBar, to create your interface.
Example: Creating a simple GUI
- Add a Control node to the scene
- Add a Label node as a child of the Control node
- Set the "Text" property of the Label node (e.g., "Score: 0")
For more information on GUI and user interfaces in Godot, refer to the official Godot documentation.
10. Particles and Visual Effects
Godot provides built-in support for creating particles and visual effects. To create a particle system, add a Particles2D (for 2D) or Particles (for 3D) node to your scene. You can then customize the appearance
and behavior of the particles using the various properties and settings available in the particle system.
Example: Creating a simple particle system
- Add a Particles2D node to the scene
- Set the "Amount" property (e.g., 100 particles)
- Customize the particle appearance using the "Process Material" property
For more information on particles and visual effects in Godot, consult the official Godot documentation.
11. Networking and Multiplayer
Godot offers built-in support for creating networked and multiplayer games. The engine provides a high-level networking API, making it easy to create both client-server and peer-to-peer architectures.
Example: Creating a simple networked game
- Set up a server using the "NetworkedMultiplayerENet" class
- Connect clients to the server using the "create_client()" function
- Use the "rpc()" and "rset()" functions to send remote procedure calls
For more information on networking and multiplayer in Godot, refer to the official Godot documentation.
12. Exporting Your Game
Once you’ve finished developing your game, you’ll want to export it to various platforms. Godot supports exporting to Windows, macOS, Linux, Android, iOS, and more. To export your game, go to “Project” > “Export” in the main menu and configure the export settings for your target platform.
Example: Exporting a game for Windows
- Go to "Project" > "Export"
- Click "Add..." and select "Windows Desktop"
- Configure the export settings (e.g., application icon, signing options)
- Click "Export Project" and choose a destination
For more information on exporting games in Godot, consult the official Godot documentation.
In conclusion, Godot is a powerful and versatile game engine that provides a wide range of features for game development. By following this introduction and exploring the various resources provided, you’ll be well on your way to creating your own games with Godot. Good luck, and happy game development!